Diskpart Format USB — FAT32, NTFS, exFAT (Guide + IM-Magic option)
This guide shows how to format USB flash drives using Diskpart (CMD) plus an easy GUI alternative: IM-Magic Partition Resizer. It includes commands, troubleshooting tips, and step-by-step instructions so even beginners can follow safely.
clean will permanently erase the selected disk/partition. Always back up important files and double-check disk numbers before running commands.
Part 1 — Diskpart: format USB to FAT32 (quick)
Best for wide device compatibility (phones, cameras, older devices). Note: Windows built-in tools often refuse to create FAT32 on very large partitions (>32GB). If you need a FAT32 on a large drive, consider IM-Magic Partition Resizer or third-party FAT32 formatters.
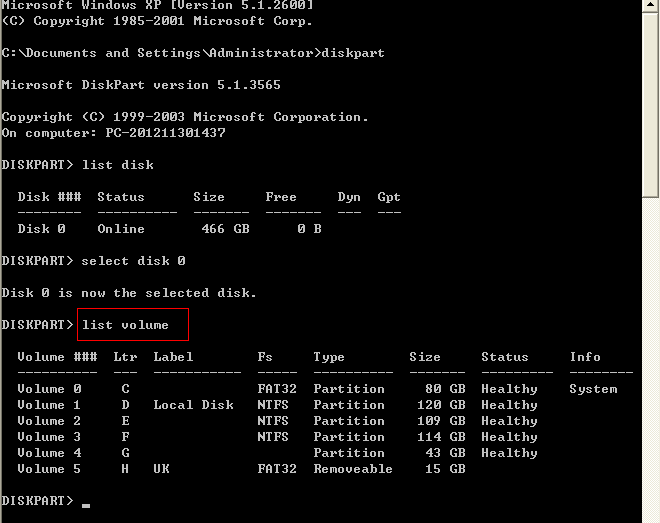
diskpart
list disk
select disk 1        <-- replace 1 with your USB disk number (confirm by size)
clean                <-- optional: wipes partition table (data lost)
create partition primary
select partition 1
format fs=fat32 quick
assign
exit
If format fs=fat32 fails on large drives, use exFAT or a GUI formatter (see IM-Magic section).
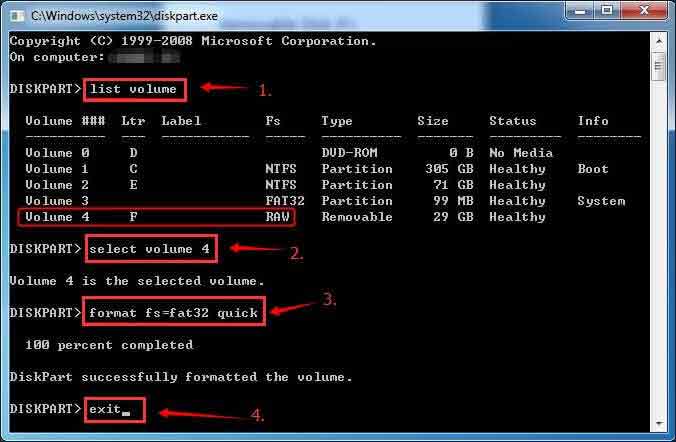
Part 2 — Diskpart: format USB to exFAT (quick)
diskpart
list disk
select disk 1
clean
create partition primary
select partition 1
format fs=exfat quick
assign
exit
exFAT supports large files and is widely compatible on modern OSes (Windows, macOS, some cameras and smart TVs).
Part 3 — Diskpart: format USB to NTFS (quick)
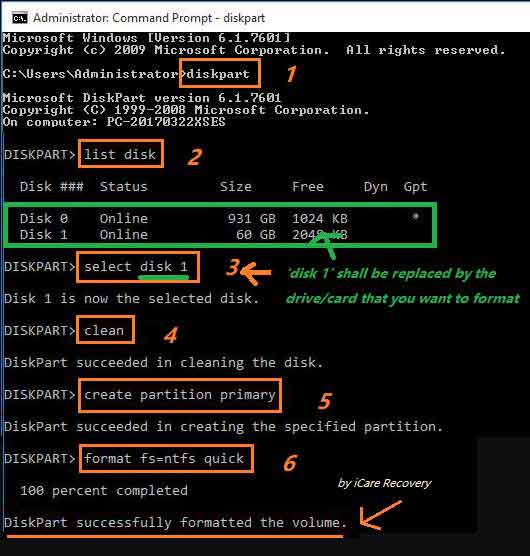
diskpart
list disk
select disk 1
clean
create partition primary
select partition 1
format fs=ntfs quick
assign
exit
NTFS is preferable for Windows-only environments, supports large files, and offers journaling + permissions.
Also read: diskpart format guide
If Diskpart fails to format — quick fixes
- Try clean + create partition + format: remove all partition metadata then recreate the partition (see commands above).
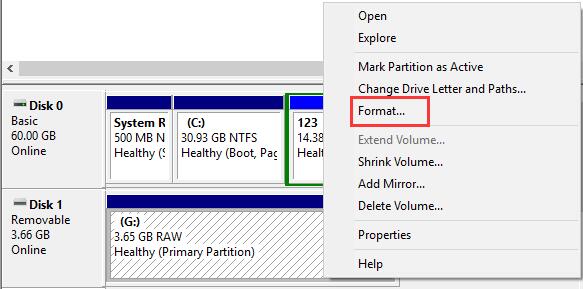
- Use Disk Management: Right-click This PC > Manage > Disk Management and try to format or delete the volume then recreate it.
- Check for bad sectors: run
chkdsk X: /f(replace X with the USB letter) to scan for errors before formatting. - Use a GUI tool such as IM-Magic Partition Resizer if Diskpart fails or Windows refuses to create FAT32 on large drives (instructions below).
Video - how to format usb under disk management
Not working? Also read: 8 free disk format tools, or how to force format usb drive
Formatted usb flash drive by mistake? How to recover files?
If usb drive was formatted by mistake, restore it free with iCare Recovery Free.
Read this guide: how to recover files after diskpart clean or format
Disk write-protected? How to clear
If your USB is write-protected, there are two common causes: a physical write switch on the device, or a software/disk attribute set to read-only. Try:
diskpart
list disk
select disk 1
attributes disk clear readonly
online disk
exit
When usb flash drive or usb disk is write protected, there are two cases.
- The drive is enabled with write protection, you may remove it by using 'clean' command in the diskpart lines
- The drive is dying that cannot be changed no matter write, or delete (solution: you may firstly use clean command and create partition primary to try; or delete the volume in disk management, and then create a new volume for it under disk management); if it still failed, then repair your usb drive with 8 free ways.
If that fails, the device may be failing or hardware-locked. Try backup & replace or use IM-Magic's wipe/format tools (see below).
Also read: format usb error write protected [5 fixes]
Make a USB bootable (BIOS/legacy) using Diskpart + bootsect
How to format usb drive with diskpart cmd in bootable mode? Or do you want to make a usb flash drive bootable for your computer?
#1 - if you want to format it in bootable bios mode, you may need to remember its drive letter and then type "format *: /fs:ntfs" (replace * with your usb drive letter)
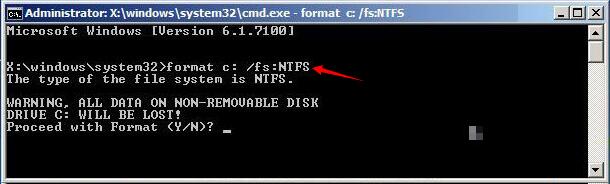 format usb in bootable mode
Also read: how to format drive in bios
#2 - if you want to create a bootable usb flash drive?
https://docs.microsoft.com/en-us/windows-server-essentials/install/create-a-bootable-usb-flash-drive
Watch the following video:
To create an NTFS bootable USB for Windows (legacy BIOS), run:
diskpart
list disk
select disk 1
clean
create partition primary
select partition 1
active
format fs=ntfs quick
assign letter=U
exit

:: then (from elevated cmd):
bootsect /nt60 U: /mbr

:: finally copy Windows installation files to U:
xcopy /e /f /h "D:\*" "U:\"  <-- D: = mounted ISO or source folder
For UEFI bootable USBs, format as FAT32 and use Rufus or the Microsoft Media Creation Tool — they handle EFI boot files automatically.
Optional GUI method — IM-Magic Partition Resizer (format & convert)
IM-Magic Partition Resizer is a small GUI partition manager that can format, convert file systems (e.g. NTFS ↔ FAT32 in certain cases), resize partitions without data loss, and format large USB drives to FAT32 when Windows refuses. The tool offers a free edition for common tasks and paid editions with advanced features.
- User-friendly visual interface (right-click operations).
- Can format or convert file systems when Windows tools are limited.
- Shows a preview of pending changes and applies them only after you click Apply.
Steps — Format a USB drive to FAT32 / exFAT / NTFS with IM-Magic
- Download & install IM-Magic Partition Resizer from its official website and run it as Administrator. (Choose the Free edition for basic formatting tasks.)
- Locate your USB in the disk map — the program lists disks and partitions with sizes and file systems.
- Right-click the USB partition you want to change and choose one of these options:
Format Partition— to change filesystem to NTFS / FAT32 / (select from the dropdown).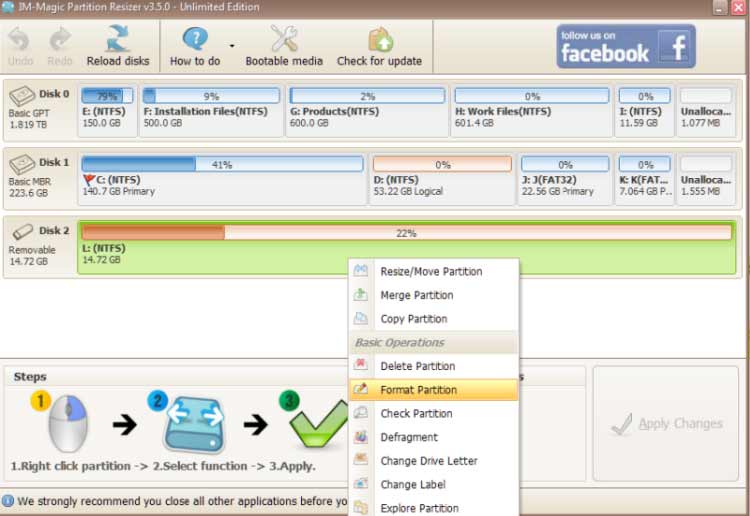
Convert NTFS to FAT32— when the drive is NTFS and you want FAT32 (works in supported scenarios).Wipe Partition— if you want a low-level wipe before formatting (destructive).
- Choose the target file system (FAT32, NTFS ). Optionally set a volume label and cluster size if you need a specific allocation unit size (advanced users).
- Preview changes: IM-Magic will show the pending operation in the left sidebar or preview pane — confirm it targets the correct disk/partition.
- Click Apply Changes (or the green check). The program may require a reboot for certain operations — follow its prompts.
- Verify the result: After apply/reboot, check in File Explorer or Disk Management that the USB shows the chosen file system and expected size.
Tip: If you need FAT32 on a large USB (e.g., 64GB or 128GB), IM-Magic's "Convert NTFS to FAT32" or "Format Partition → FAT32" can sometimes succeed where Windows format fails. Always back up before converting or formatting.
Extra — Frequently asked quick answers
- My USB won't format at all: try Diskpart
clean, checkattributes disk clear readonly, then format; if still failing, try IM-Magic's wipe + format or test on another PC. - Need FAT32 but file larger than 4GB: FAT32 can't hold files >4GB — use exFAT or NTFS instead.
- Want to make Windows installer USB: use Rufus or Microsoft Media Creation Tool (they handle UEFI & BIOS properly).
Last updated on June 20, 2026
Related Articles